Automate your Functions (Custom Logic Automation)
This tutorial shows you how to use Chainlink Automation to automate your Chainlink Functions. Automation is essential when you want to trigger the same function regularly, such as fetching weather data daily or fetching an asset price on every block.
Read the Automate your Functions (Time-based Automation) tutorial before you follow the steps in this example. This tutorial explains how to trigger your functions using an Automation compatible contract.
After you deploy and set up your contract, Chainlink Automation triggers your function on every block.
Before you begin
-
Complete the setup steps in the Getting Started guide: The Getting Started Guide shows you how to set up your environment with the necessary tools for this tutorial.
-
Make sure to understand the API multiple calls guide.
-
Make sure your subscription has enough LINK to pay for your requests. Also, you must maintain a minimum balance to upload encrypted secrets to the DON (Read the minimum balance for uploading encrypted secrets section to learn more). You can check your subscription details (including the balance in LINK) in the Chainlink Functions frontend. If your subscription runs out of LINK, follow the Fund a Subscription guide. This guide recommends maintaining at least 2 LINK within your subscription.
-
You can locate the scripts used in this tutorial in the examples/10-automate-functions directory.
-
Get a free API key from CoinMarketCap and note your API key.
-
Run
npx env-enc setto add an encryptedCOINMARKETCAP_API_KEYto your.env.encfile.npx env-enc set
Tutorial
This tutorial is configured to get the median BTC/USD price from multiple data sources on every block. Read the Examine the code section for a detailed explanation of the code example.
Deploy an Automated Functions Consumer contract
-
Deploy a Functions consumer contract on Polygon Mumbai:
- Open the CustomAutomatedFunctionsConsumerExample.sol in Remix.
- Compile the contract.
- Open MetaMask and select the Polygon Mumbai network.
- In Remix under the Deploy & Run Transactions tab, select Injected Provider - MetaMask in the Environment list. Remix will use the MetaMask wallet to communicate with Polygon Mumbai.
- Under the Deploy section, fill in the router address for your specific blockchain. You can find both of these addresses on the Supported Networks page. For Polygon Mumbai, the router address is
0x6E2dc0F9DB014aE19888F539E59285D2Ea04244C. - Click the Deploy button to deploy the contract. MetaMask prompts you to confirm the transaction. Check the transaction details to make sure you are deploying the contract to Polygon Mumbai.
- After you confirm the transaction, the contract address appears in the Deployed Contracts list. Copy your contract address.
-
Create a Chainlink Functions subscription and add your contract as an approved consumer contract. Note: If you followed the previous tutorials, then you can reuse your existing subscription.
Configure your Automation Consumer contract
Configure the request details by calling the updateRequest function. This step stores the encoded request (source code, reference to encrypted secrets if any, arguments), gas limit, subscription ID, and job ID in the contract storage (see Examine the code). To do so, follow these steps:
-
On a terminal, go to the Functions tutorials directory.
-
Open updateRequest.js and replace the consumer contract address and the subscription ID with your own values:
const consumerAddress = "0x5abE77Ba2aE8918bfD96e2e382d5f213f10D39fA" // REPLACE this with your Functions consumer address const subscriptionId = 3 // REPLACE this with your subscription ID -
Run the updateRequest.js script to update your Functions consumer contract's request details.
Configure Chainlink Automation
The consumer contract that you deployed is designed to be used with a custom logic automation. Follow the instructions in the Register a Custom Logic Upkeep guide to register your deployed contract using the Chainlink Automation App. Use the following upkeep settings:
- Trigger: Custom logic
- Target contract address: The address of the Chainlink Functions consumer contract that you deployed
- Check data: Leave this field blank
- Gas limit:
1000000 - Starting balance (LINK):
1
You can leave the other settings at their default values for the example in this tutorial.
At this stage, your Functions consumer contract is configured to get the median Bitcoin price on every block.
Check Result
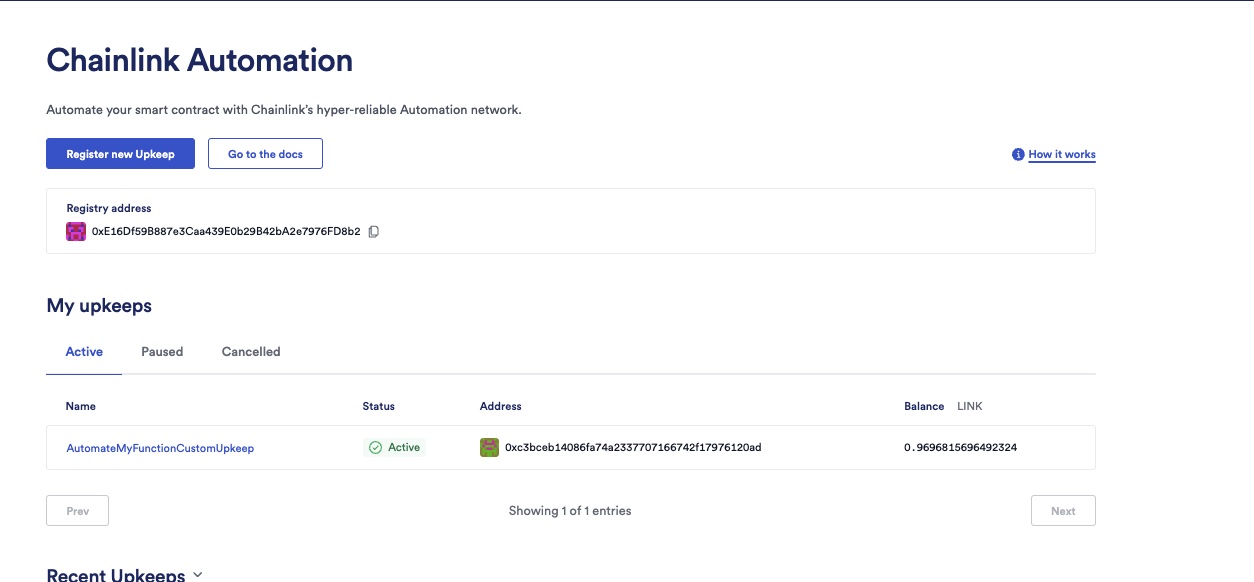
Go to the Chainlink Automation App and connect to Polygon Mumbai. Your upkeep will be listed under My upkeeps:

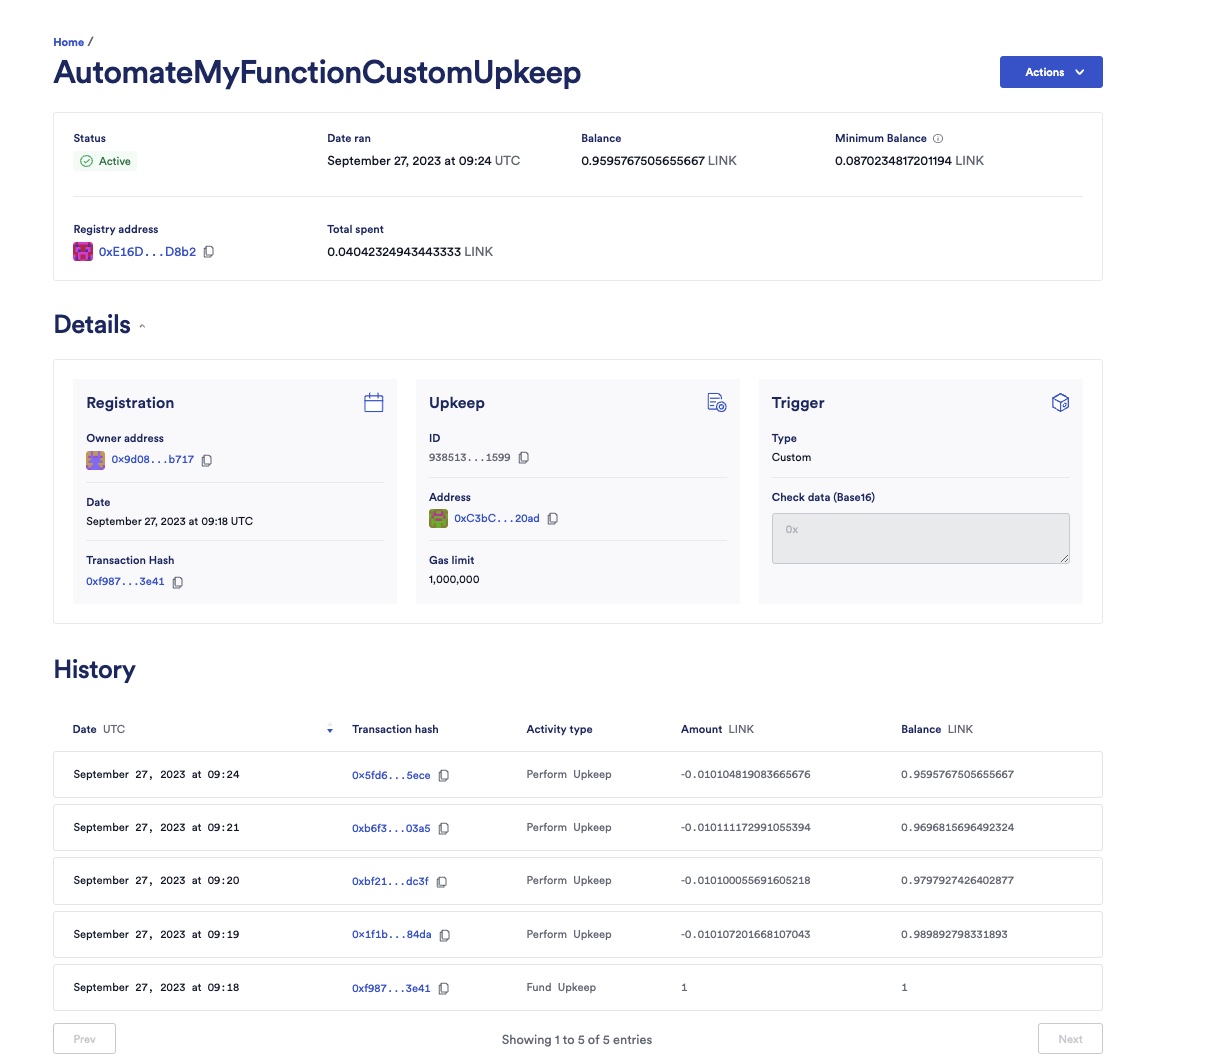
Click on your upkeep to fetch de details:

On your terminal, run the readLatest to read the latest received response:
- Open
readLatest.jsand replace the consumer contract address with your own values:
const consumerAddress = "0x5abE77Ba2aE8918bfD96e2e382d5f213f10D39fA" // REPLACE this with your Functions consumer address- Run the readLatest script.
node examples/10-automate-functions/readLatest.jsExample:
$ node examples/10-automate-functions/readLatest.js
secp256k1 unavailable, reverting to browser version
Last request ID is 0x310d57a7af34ae4ce565f5745ff46fe2706e96b25b3172ada60cc60f4603b38e
✅ Decoded response to uint256:  2625865n
Clean up
After you finish the guide, cancel your upkeep in the Chainlink Automation App and withdraw the remaining funds. After you cancel the upkeep, there is a 50-block delay before you can withdraw the funds.
Examine the code
CustomAutomatedFunctionsConsumer.sol
// SPDX-License-Identifier: MIT
pragma solidity 0.8.19;

import {FunctionsClient} from "@chainlink/contracts/src/v0.8/functions/dev/v1_0_0/FunctionsClient.sol";
import {AutomationCompatibleInterface} from "@chainlink/contracts/src/v0.8/automation/AutomationCompatible.sol";
import {ConfirmedOwner} from "@chainlink/contracts/src/v0.8/shared/access/ConfirmedOwner.sol";

/**
 * @title Functions contract used for Automation.
 * @notice This contract is a demonstration of using Functions and Automation.
 * @notice NOT FOR PRODUCTION USE
 */
contract CustomAutomatedFunctionsConsumerExample is
    FunctionsClient,
    AutomationCompatibleInterface,
    ConfirmedOwner
{
    uint256 public lastBlockNumber;
    bytes public request;
    uint64 public subscriptionId;
    uint32 public gasLimit;
    bytes32 public jobId;
    bytes32 public s_lastRequestId;
    bytes public s_lastResponse;
    bytes public s_lastError;

    error UnexpectedRequestID(bytes32 requestId);

    event Response(bytes32 indexed requestId, bytes response, bytes err);

    constructor(
        address router
    ) FunctionsClient(router) ConfirmedOwner(msg.sender) {}

    /**
     * @notice Checks if upkeep is needed based on the difference between the current and the last block number.
     * @dev This function checks if the current block number has incremented since the last recorded block number and returns a boolean indicating if upkeep is needed.
     * @return upkeepNeeded A boolean indicating if upkeep is needed (true if the current block number has incremented since the last recorded block number).
     * @return performData An empty bytes value since no additional data is needed for the upkeep in this implementation.
     */
    function checkUpkeep(
        bytes calldata /* checkData */
    )
        external
        view
        override
        returns (bool upkeepNeeded, bytes memory performData)
    {
        upkeepNeeded = block.number - lastBlockNumber > 0; // Check if the current block number has incremented since the last recorded block number
        // We don't use the checkData in this example. The checkData is defined when the Upkeep was registered.
        return (upkeepNeeded, ""); // Return an empty bytes value for performData
    }

    /**
     * @notice Send a pre-encoded CBOR request if the current block number has incremented since the last recorded block number.
     * @dev We highly recommend revalidating the upkeep in the performUpkeep function. The performData is generated by the Automation Node's call to your checkUpkeep function and is not used in this implementation.
     */
    function performUpkeep(bytes calldata /* performData */) external override {
        //We highly recommend revalidating the upkeep in the performUpkeep function
        if (block.number - lastBlockNumber > 0) {
            s_lastRequestId = _sendRequest(
                request,
                subscriptionId,
                gasLimit,
                jobId
            );
            lastBlockNumber = block.number;
        }
        // We don't use the performData in this example. The performData is generated by the Automation Node's call to your checkUpkeep function
    }

    /// @notice Update the request settings
    /// @dev Only callable by the owner of the contract
    /// @param _request The new encoded CBOR request to be set. The request is encoded off-chain
    /// @param _subscriptionId The new subscription ID to be set
    /// @param _gasLimit The new gas limit to be set
    /// @param _jobId The new job ID to be set
    function updateRequest(
        bytes memory _request,
        uint64 _subscriptionId,
        uint32 _gasLimit,
        bytes32 _jobId
    ) external onlyOwner {
        request = _request;
        subscriptionId = _subscriptionId;
        gasLimit = _gasLimit;
        jobId = _jobId;
    }

    /**
     * @notice Store latest result/error
     * @param requestId The request ID, returned by sendRequest()
     * @param response Aggregated response from the user code
     * @param err Aggregated error from the user code or from the execution pipeline
     * Either response or error parameter will be set, but never both
     */
    function fulfillRequest(
        bytes32 requestId,
        bytes memory response,
        bytes memory err
    ) internal override {
        if (s_lastRequestId != requestId) {
            revert UnexpectedRequestID(requestId);
        }
        s_lastResponse = response;
        s_lastError = err;
        emit Response(requestId, s_lastResponse, s_lastError);
    }
}
-
To write an automated Chainlink Functions consumer contract, your contract must import FunctionsClient.sol. You can read the API reference of FunctionsClient.
The contract is available in an NPM package, so you can import it from within your project.
import {FunctionsClient} from "@chainlink/contracts/src/v0.8/functions/dev/v1_0_0/FunctionsClient.sol"; -
To write a compatible Automations contract, your contract must import AutomationCompatibleInterface.sol.
The contract is available in an NPM package, so you can import it from within your project.
import {AutomationCompatibleInterface} from "@chainlink/contracts/src/v0.8/automation/AutomationCompatible.sol"; -
The
lastBlockNumberis stored in the contract. It represents the block number of the last timeperformUpkeepwas triggered. -
The encoded
request,subscriptionId,gasLimit, andjobIdare stored in the contract storage. The contract owner sets these variables by calling theupdateRequestfunction. Note: The request (source code, secrets, if any, and arguments) is encoded off-chain. -
The latest request id, latest received response, and latest received error (if any) are defined as state variables:
bytes32 public s_lastRequestId; bytes public s_lastResponse; bytes public s_lastError; -
We define the
Responseevent that your smart contract will emit during the callbackevent Response(bytes32 indexed requestId, bytes response, bytes err); -
Pass the router address for your network when you deploy the contract:
constructor(address router) FunctionsClient(router) -
The three remaining functions are:
-
checkUpkeepfor checking off-chain ifperformUpkeepshould be executed.performUpkeepshould only be executed if the current block number is higher than the block number of the last execution. -
performUpkeep: Executed by Chainlink Automation whencheckUpkeepreturnstrue. This function sends the request (encoded inbytes) to the router by calling theFunctionsClientsendRequestfunction. -
fulfillRequestto be invoked during the callback. This function is defined inFunctionsClientasvirtual(readfulfillRequestAPI reference). So, your smart contract must override the function to implement the callback. The implementation of the callback is straightforward: the contract stores the latest response and error ins_lastResponseands_lastErrorbefore emitting theResponseevent.s_lastResponse = response; s_lastError = err; emit Response(requestId, s_lastResponse, s_lastError);
-
source.js
The JavaScript code is similar to the one used in the Call Multiple Data Sources tutorial.
updateRequest.js
The JavaScript code is similar to the one used in the Automate your Functions (Time-based Automation) tutorial.
readLatest.js
The JavaScript code is similar to the one used in the Automate your Functions (Time-based Automation) tutorial.

